Pages

Wednesday, February 25, 2009

Perfect Practice Equals Perfect Performance

by Teresa Fackrell

Here’s a great way to become perfect at just about anything: When you practice, don’t ever do it wrong. If you practice perfectly, you will become perfect. This applies to all rodeo events and anything else you would like to do exceptionally well.

The Jazz Master’s Secret

Legendary jazz guitarist Howard Roberts says the secret of his virtuosity: “Never practice a mistake.”

According to Roberts, most musicians, in their eagerness to play complex pieces, move too fast. What he had always done and the secret to his success was to practice only what he could do perfectly.

His theory was that any learning is the biological process of creating neural networks in the brain. Every perfect repetition beats a good path one that you can travel on later. Every incorrect repetition beats a parallel but incorrect path one that you can easily slide onto if you aren’t careful.

The more you practice the right moves, the deeper the memory path. The trick is to make the correct paths as deep as possible and the incorrect paths shallow or nonexistent.

The faster you eventually perform a task, the more likely it is that you will make a mistake, unless, that is, you have cut only one path for it a perfect one. Likewise, when you are performing a task under stress or in association with other tasks, it is easy to bungle it unless you have no neurological way to screw it up.

The trouble with most guitar students, Roberts said, is that they rush themselves. They are fixated on completing a movement rather than on performing it well. They figure the sooner they can simulate the completed movement, the better they are doing. But the truth is quite different.

How To Practice Everything Perfectly

Each rodeo event has several parts and is complex. That’s why we learn them in pieces. Whether it’s guitar playing, barrel racing, or roping, the ultimate performance is a complex combination of many simpler tasks.

Thus, to make the performance perfect you need to perfect each of the simpler tasks. To do a task perfectly even a simple task usually means slowing down. You should slow down as much as you need to in order to make the movement perfect.

Make sure to take time to practice at a slow pace. This may mean walking or trotting through a barrel pattern several times or sitting on the horse and roping the dummy. The important thing is that when you go slow, you should be moving, sitting, swinging, and riding the exact same way as when you go fast.

Don’t worry about your progress. Doing a repetition at half speed does not make the learning process twice as long. It makes it faster, because you are creating just one neural pathway and none to cause you to stray from your course.

The fundamental rule is this: Do it right every time you try and you will learn faster and perform better. The secret to perfect performance is not some predetermined natural gift, but a determination to practice it correctly. Consistent perfect practice results in consistent perfect performance.

Tuesday, February 24, 2009

What’s crazier than bull riding? Bulldogging!

by Wendy Winn

Bulldogging is not for the weak or scared. Do you want to fly out of the box with a crazy man on your left with a bat? Most normal boys would say heck no. It’s a great thrill but must be done with form and skill.

Tips from a mom on how to get started in bull dogging.
1) Start with an instructor, school, professional
2) Ground instruction about positioning yourself off your horse

The best way to accomplish this is with two bales of straw covered with a horse blanket or cover. You will slide off a gentle horse onto the bales to learn how to get off.
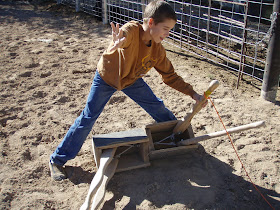
3) Find a ski dummy, hooked to a four wheeler. You will learn how to position your feet and body when you are actually hooked onto a wild steer after jumping
4) After you are tired and worn out, you will be able to get off of horse!!
5) Make sure you have a skilled hazer to help you.

Dixon started chute dogging in the 6th grade, while doing the Wrangler Jr High Series. Chute dogging is a great experience if you learn the right way. We spent many hours dogging cattle out of the chute.


Last year Dixon decided to try from a horse. First thing we did was go to a school; he went to Tom Lewis in Lehi. He learned lots of good lessons and received professional help. Dixon also spent some time last summer with Shane Frost who is an amazing bull dogger.

Dixon likes bull dogging and it has helped him in the all –around race at the high school rodeos. Bull dogging is a great sport, another huge adrenaline rush, for all you adrenaline junkies!

When you decide to dog, be very serious and not afraid fear will cause lots of trouble. Kids who are afraid never get off their horse at the rodeo, and waste their time. Make sure you are committed and tear them up. Good luck!

Monday, February 23, 2009

Wednesday, February 18, 2009

Bull Riding Tips for Beginners

by Wendy Winn

Bull riding is a great sport. It is exciting, breathtaking, and extremely risky to the rider. Injury is very prevalent in this sport! Here are some tips that I would share with you as a mother if your boy would like to start.

1. First and foremost go to a school or clinic with a professional
2. Borrow some equipment until you really are committed
3. Make sure the equipment is safe and working
4. Find a place to practice on some good animals
5. Have a good time
6. As a mother you will be less nervous if you help prepare your children

My husband rode professionally for 8 years, and now both sons have taken an interest in bull riding. As a mother the most asked question is “are you scared”? The answer is no, I feel like my kids are prepared. They know how to get out if they are in trouble and they know how to land. Both Dixon and Shad can set their ropes if their dad is not there.

Bull riding is about hustle. You can’t over ride or you get bucked off. Bull Riding is jump for jump every time out of the chute. Other riders will tell you what to expect, but we feel like its better to just get on and make a ride.

Dixon is 16, and has been riding since he was 4. He is tall for a bull rider at 6’ 2”. He has to really hustle his legs and feet, because there is so much more gravitational pull for him. Naturally your chin should stay in the center of your face and perched down. Dixon uses his free arm for balance and to help him pull out of the well, if he gets there. The movement would project a reach with your arms and a pop or reach with your hips.

Shad is our 10 year old; he has been riding since he was 4 also. Shad is much smaller than Dixon and really can stay balanced. His free arm is always at our above eye level. Shad rides them naturally if he hustles his feet and is determined.

You have to be dedicated to be a bull rider and most of all there cannot be any fear! If you are scared stay in the rope pen! I can not stress that enough!

Good luck! Remember to come prepared and hustle!

Tuesday, February 17, 2009

Upcoming Saddle Series Rodeo

Central Utah Little Britches will be holding a Saddles Series March 27-29 and May 29-31.

The rodeos will be held at the Blackhawk Arena in Salina Utah. For more information go to their web page at

http://www.allhorseutah.com/CULBR.htm

Monday, February 16, 2009

Getting Started - Picture of The Week

Some things are so cute like kids getting started in rodeo.

Friday, February 13, 2009

Going to the Pin

by Teresa Fackrell

Another key point in roping is to not break the barrier. One of the best tips for not breaking the barrier is to always go to the pin. The pin is the place where the barrier is hooked to the chute. The pin is circled in the picture on the right.

If you point you horse to the pin, when the barrier is released it will move away from your horse. Also the diagonal from the back of the box to the pin is the longer than just coming straight out of the box. You have less chance of breaking it if you go the longest distance.

The big plus is this also puts your horse in a better position to rope the calf than if you come out straight. So always remember go to the pin.

Wednesday, February 11, 2009

First Aid in Horses

by Kendra Sagers

If you own, work with, or are very often around a horse, you will have the need for first aid. All horses are susceptible to injury and/or illness.

As a responsible horse person, it is important that you know at least the basics of first aid. You should know how to recognize signs of injury and illness in a horse. Including knowing the vital signs and recognizing when a horse is in distress or just “off”.

Review of Vital Signs:

Heart Rate or Pulse: 28 - 40 Beats per minute
Respiration: 8 – 16 Breaths per minute
Temperature: 99 – 101 degrees F
Capillary Refill Time (CRT): Approx. 2 sec.
Hydration (Pinch Test): Skin flattens immediately.

You can review how to take vitals signs by clicking
here.

It is important that you know your horse and his normal range. For example, if I have a horse that has a normal temperature of 101, then I am not going to get too excited if his temperature rises to 102. However, if I have a horse with a normal temp of 99 a rise to 102 is more of a concern.

How do you know when your horse requires first aid?

There are some obvious signs. If your horse is bleeding, it is obvious that he requires first aid. But, if a horse is simply standing in the back of his stall with his head hung low, unless you know the horse, you may not know there is a problem. I suggest you keep your horse’s normal vital signs on hand in your first aid kit so that you or whoever is caring for your horse will have access to them.

Once you have determined that you have a need for first aid, the following steps are helpful:

PRIMARY RULES OF EQUINE FIRST AID:

1. Don’t panic! Calm yourself and gather your thoughts. Then, proceed in a slow and calm manner. Panicking will only add further stress to a situation. Remember, your horse is likely already excited and scared. He is depending on you to handle the situation.

2. Evaluate the horse and his actions. Is he acting in such a way that you can safely approach and help him? If he his not, do not approach. This could cause you injury as well. Wait for or call for help.
3. Reassure the horse. If it is possible, move him to a quiet and familiar place. Help to calm your horse by rubbing him and talking calmly to him. Move quietly and slowly around the horse.

4. Once you are safe and the horse is calm enough to work on, assess the situation. Determine the extent of the injury or illness. If the emergency is something you can handle begin first aid care.

5. If you are not able to adequately care for the emergency, consult a veterinarian immediately and follow his advice.

In many cases, especially cases of illness, it is a good idea to have current vital signs on hand when contacting a veterinarian. This can give him a better assessment of the situation.

Tuesday, February 10, 2009

Tackling Everything

"Nothing is particularly hard if you break it down into small jobs." -Henry Ford

By Lisa Woodland

This quote applies to everything wether we are talking work, house work, practice, everything. So when tackling anything, break it into small steps and check them off one by one. You will be accomplishing something this always makes a person feel good and makes you want to continue.

Sunday, February 8, 2009

Get Your Rope Going

by Teresa Fackrell

In roping, kids have a tendency to come out of the box and wait till they get close to the cow before they start to swing their rope. They may lope halfway down the arena before they ever start to swing.

The kids that have the quickest times in the 2 to 3 second range have one thing in common, they get their rope going. The only way to be really fast is to start to swing your rope as soon as you nod. Your rope should be going before you leave the rope box.

See the picture on the right. Before the barrier has completely broken or the calf has completely left the chute she is swinging her rope. So get your roping going.

Tuesday, February 3, 2009

A Good Place to Start

By Shauna Winters

I always knew that I wanted my kids to rodeo. As I look back, I realized what I missed out on because I was scared to be in front of a crowd. I helped out with things, but I never competed. Of course, Junior Rodeo was not the same as it is today.

My brothers had competed on the High School Rodeo Team. The team had a Little Buckaroo Rodeo each year as a fund raiser, so I always signed my kids up. Kassidy started at about 2 years old riding sheep. I can honestly say it was never her favorite thing, but Grandpa Jerry was a good sport and he would put her on and hold on to her for a little ways. She was usually screaming.

Then Wendy and Casy Winn started the Central Utah Junior Rodeo Series. I, of course, signed my kids up. I’m not sure who was more excited, me or them. W
e put them on my brother’s horse. He was only 2 and didn’t know the patterns or anything, but neither did my kids. We would run through the patterns with them, leading them, trying to get them to trot while they were screaming for us to slow down…..What a great time!

Kassidy got involved in the Queen contest. Now, Kass was one of those kids who did not want to draw attention to herself. She was perfectly content to sit back and be scenery. I could not believe the growth just from that experience. Of course, she was taking 4-H and learning other things to become more comfortable around her horse, but I couldn’t believe the way she came out of her shell. It was a very positive experience for her.

I always signed Karlin up to ride calves. I’m not really sure why, because I knew I didn’t want him to be a bull rider (my nerves couldn’t take it), but it was okay when they were little calves. My dad bought him and my nephew their riding gear. They got matching chaps and vests. They looked really sharp, and of course, we all know that’s the most important thing, right? Anyway, Grandpa Jerry was a pretty good coach and Karlin enjoyed it. He also began running barrels and poles and tying goats. He has been doing it for about 3 years now. Again, the growth that I have seen in Karlin is amazing.

Kyla is only 5 and has been competing for a couple of years. She has no fear. I am not sure that is a good thing, but she loves the rodeo. It is a great way for her to get used to being in front of people (which I’m not sure has ever been a problem for her). She begs us every day to go riding. She runs the barrels (just to feel the wind blow through her hair) and poles. Her patterns are not always pretty, but she usually gets the crowd going. And most importantly, she enjoys herself.

Junior Rodeo is a great place for the kids to get started. It helps to build their confidence and skills. I am grateful for friends and neighbors who are willing to help my kids, even when they are competing against their own kids. I am even more grateful for the great friends I have made along the way.

Monday, February 2, 2009

Funnel Barrel Patterns 2

by Kendra Sagers

As I promised, here are some more of the funnel barrel patterns. Again, use these patterns to work your horses to train, fix problems, or just to exercise. Be careful not to work any pattern excessively. There are a lot of possibilities with these patterns so be sure to shake it up a bit.

As a refresher from the last article, you can use cones, tires, or barrels as markers for these patterns. To work the patterns at a trot or canter I suggest 80' between the widest markers, 60' between the middle markers, and 40' between the shortest markers. Each pattern is discussed below.

This is the funnel pattern I call Outside Left or Right. This means you can work it in either direction. This pattern can be worked at a walk, trot, or slow canter, as with all other patterns start slow and speed up gradually as your horse is able. You can also remember that it is often a good idea to turn the barrel at a gait slower than you entered the barrel. For example, if you are at a canter entering the barrel drop to a trot to turn the barrel and then pick the canter back up as you leave. This helps the horse rate naturally. Only work this pattern at speeds where YOU are completely in control and able to maintain your horse’s body shape. Also remember to keep your circles around the barrels smooth and even.

I call this pattern Now and Then. This pattern helps you to work your horse on his circles, both large and small. The benefit to this type of pattern is that the barrels are not turned in sequence. You decide when to turn and keep your horse guessing and waiting for your cue. When working this pattern I suggest you do so on either a trot or a canter or a combination of both. You will begin by working a large circle around the funnel pattern. While working this large circle you can either follow the number sequence that I have provided or you can turn the pattern at random. Remember to maintain control, shape, and distance in this and all patterns. This pattern can also be worked from either direction and either end.

I call this funnel pattern Round About. It works your horse in both directions. This pattern will help keep your horse listening to you while working on your turns. Follow the sequence of numbers for the pattern zig zagging and turning every other marker. You should enter on the large end of the pattern and work barrels 1, 2, and 3. Then you exit the markers at the speed you worked between markers and follow the outside edge of markers, 6, 2, and 4. Enter the pattern again by working markers 4, 5, and 6. You can work this as a continuous pattern several times. I recommend using this pattern at the walk or the trot. Once you and your horse are fluid on it you can work at a canter.

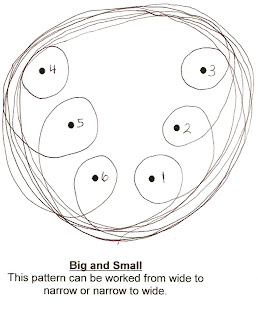
I call this pattern Big and Small. This pattern can help you to keep control of your horse and to keep him guessing and waiting for your cue. Begin working this pattern in a large circle on the outside of the pattern. As you work around the circle to marker #1 turn it, then as you leave complete a full circle to marker #2 and then turn it. Follow this sequence through the rest of the markers. Feel free to circle the marker more than once if you would like. Also, you can break to a slower gait to turn the marker. When working it be sure to maintain control, shape, and distance from the markers. Because of the distances of the circles I prefer to work this pattern at a tort or canter, but will often break to a walk around the marker. Make sure you are in control and allow your horse plenty of room.

These are a few more of the funnel patterns that I use to help train, condition, and fix problems in my barrel horses. Again, I like these patterns because I can set the pattern up once and use it for several different exercises. It helps keep my horses fresh and listening to me. Be careful, though, not to work any one pattern too much. If worked excessively these patterns can also sour a horse. If you like these funnel patterns I will show you more in a later blog.